定义
原型实例指定创建对象的种类,并通过拷贝这些原型创建新的对象。
适用场景
类初始化消耗较多资源
new产生的一个对象需要非常繁琐的过程,(数据准备,访问权限等)
构造函数比较复杂
循环体重生产大量对象
优点和缺点 优点
原型模式性能比直接new一个对象性能高
简化创建过程
缺点
必须配备克隆方法
对克隆复杂对象或对克隆出的对象进行复杂改造时,容易引入风险
深拷贝、浅拷贝要运用得当
代码实现 假设一个场景,我们要发送大量邮件,邮件的标题发送地址内容,都是不同的或者有部分相同,而创建一个邮件对象假如耗时比较长,我们就可以用克隆来实现
只要对象类实现Cloneable接口,然后重写clone方法就可以实现简单的克隆
1
2
3
4
5
6
7
8
9
10
11
12
13
14
15
16
17
18
19
20
21
22
23
24
25
26
27
28
29
30
31
32
33
34
35
36
37
38
39
public class Mail implements Cloneable private String content; private String mailAddress; private String title; public String getContent () return content; } public void setContent (String content) this .content = content; } public String getMailAddress () return mailAddress; } public void setMailAddress (String mailAddress) this .mailAddress = mailAddress; } public String getTitle () return title; } public void setTitle (String title) this .title = title; } @Override public Mail clone () try { return (Mail) super .clone(); } catch (CloneNotSupportedException e) { throw new AssertionError(); } } }
clone方法中可以根据具体情况添加业务逻辑,具体调用如下
1
2
3
4
5
6
7
8
public class Test public static void main (String[] args) Mail mail = new Mail(); Mail clone = mail.clone(); System.out.println(mail); System.out.println(clone); } }
1
2
com.ys.Mail@7f31245a com.ys.Mail@6d6f6e28
原型模式的克隆是分深克隆和浅克隆的,需要注意使用场景;
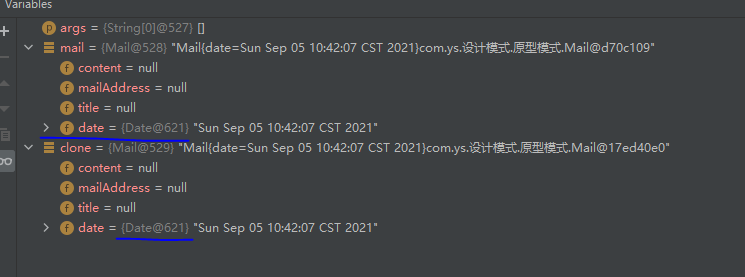
浅克隆 :创建一个新的对象,新对象的属性和原来对象完全相同,对于非基本类型属性,仍指向原有属性所指向的对象的内存地址。深克隆 :创建一个新对象,属性中引用的其他对象也会被克隆,不再指向原有对象地址。
假设我们给对象类增加一个发送日期的字段,并给日期设置值
1
2
3
4
5
6
7
8
9
public class Test public static void main (String[] args) Mail mail = new Mail(); mail.setDate(new Date(0L )); Mail clone = mail.clone(); System.out.println(mail); System.out.println(clone); } }
打印结果如下
1
2
Mail{date=Thu Jan 01 08:00:00 CST 1970}com.ys.Mail@330bedb4 Mail{date=Thu Jan 01 08:00:00 CST 1970}com.ys.Mail@2503dbd3
修改我们克隆出来的对象的日期
1
2
3
4
5
6
7
8
9
10
public class Test public static void main (String[] args) Mail mail = new Mail(); mail.setDate(new Date(0L )); Mail clone = mail.clone(); clone.getDate().setTime(1630809727754L ); System.out.println(mail); System.out.println(clone); } }
结果如下
1
2
Mail{date=Sun Sep 05 10:42:07 CST 2021}com.ys.Mail@330bedb4 Mail{date=Sun Sep 05 10:42:07 CST 2021}com.ys.Mail@2503dbd3
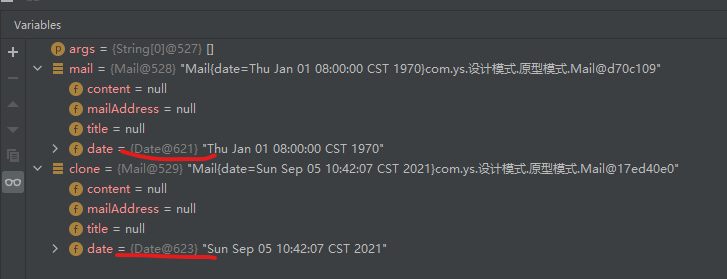
会发现两个对象依然是不同的对象,但是日期却同时都被修改了
解决办法就可以使用深克隆
1
2
3
4
5
6
7
8
9
10
11
12
13
14
15
16
17
18
19
20
21
22
23
24
25
26
27
28
29
30
31
32
33
34
35
36
37
38
39
40
41
42
43
44
45
46
47
48
49
50
51
52
53
54
55
56
57
58
public class Mail implements Cloneable private String content; private String mailAddress; private String title; private Date date; @Override public String toString () return "Mail{" + "date=" + date + '}' +super .toString(); } public Date getDate () return date; } public void setDate (Date date) this .date = date; } public String getContent () return content; } public void setContent (String content) this .content = content; } public String getMailAddress () return mailAddress; } public void setMailAddress (String mailAddress) this .mailAddress = mailAddress; } public String getTitle () return title; } public void setTitle (String title) this .title = title; } @Override public Mail clone () try { Mail clone = (Mail) super .clone(); clone.date = (Date) date.clone(); return clone; } catch (CloneNotSupportedException e) { throw new AssertionError(); } } }
重点看clone方法中的修改,对日期类型也进行了克隆。
使用序列化实现深克隆 上面所描述的深克隆方法,每次如果添加了对象属性都需要在clone方法中进行维护才能实现深克隆,通过序列化实现深克隆可以解决这种问题Serializable接口
1
2
3
4
5
6
7
8
9
10
11
12
13
14
15
16
17
18
19
20
21
22
23
24
25
26
27
28
29
30
31
32
33
34
35
36
37
38
39
40
41
42
43
44
45
46
47
48
49
50
51
52
53
54
55
56
57
58
59
60
61
62
63
64
65
66
67
68
69
70
71
72
73
74
75
76
77
78
79
80
81
82
83
84
public class Mail implements Serializable private String content; private String mailAddress; private String title; private Date date; @Override public String toString () return "Mail{" + "date=" + date + '}' +super .toString(); } public Mail mailClone () ByteArrayOutputStream bos = null ; ObjectOutputStream oos = null ; ByteArrayInputStream bis = null ; ObjectInputStream ois= null ; try { bos = new ByteArrayOutputStream(); oos = new ObjectOutputStream(bos); oos.writeObject(this ); bis = new ByteArrayInputStream(bos.toByteArray()); ois = new ObjectInputStream(bis); return (Mail) ois.readObject(); } catch (IOException | ClassNotFoundException e) { e.printStackTrace(); return null ; }finally { try { if (bos != null ) bos.close(); if (oos != null ) oos.close(); if (bis != null ) bis.close(); if (ois != null ) ois.close(); } catch (IOException e) { e.printStackTrace(); } } } public Date getDate () return date; } public void setDate (Date date) this .date = date; } public String getContent () return content; } public void setContent (String content) this .content = content; } public String getMailAddress () return mailAddress; } public void setMailAddress (String mailAddress) this .mailAddress = mailAddress; } public String getTitle () return title; } public void setTitle (String title) this .title = title; } }
自定义mailClone方法,通过对当前对象序列化然后反序列化的方法,来达到深克隆的目的,这种方法如果在对象类中新增了对象属性,不需要再进行刻意维护
1
2
3
4
5
6
7
8
9
10
11
public class Test public static void main (String[] args) Mail mail = new Mail(); mail.setDate(new Date(0L )); Mail clone = mail.mailClone(); clone.getDate().setTime(new Date().getTime()); System.out.println(mail); System.out.println(clone); } }
1
2
Mail{date=Thu Jan 01 08:00:00 CST 1970}com.ys.Mail@7ea987ac Mail{date=Sat Sep 11 19:06:14 CST 2021}com.ys.Mail@5b480cf9
UML图 克隆模式破解单例 以最简单的饿汉式单例为例,当单例类实现了Cloneable接口,并实现了clone方法就可以克隆产生多个实例
1
2
3
4
5
6
7
8
9
10
11
12
13
14
15
16
17
18
19
20
public class Singleton implements Cloneable private static Singleton instance = new Singleton(); private Singleton () public static Singleton getInstance () return instance; } @Override public Singleton clone () try { Singleton clone = (Singleton) super .clone(); return clone; } catch (CloneNotSupportedException e) { throw new AssertionError(); } } }
1
2
3
4
5
6
7
8
public class Test public static void main (String[] args) Singleton instance = Singleton.getInstance(); Singleton clone = instance.clone(); System.out.println(instance); System.out.println(clone); } }
1
2
com.ys.Singleton@7f31245a com.ys.Singleton@6d6f6e28
解决办法:第一,不实现Cloneable接口,第二,在clone方法中返回会getInstance()方法
1
2
3
4
5
6
7
8
9
10
11
12
13
14
public class Singleton implements Cloneable private static Singleton instance = new Singleton(); private Singleton () public static Singleton getInstance () return instance; } @Override public Singleton clone () return getInstance(); } }
1
2
com.ys.Singleton@7f31245a com.ys.Singleton@7f31245a

