环境准备 Docker 安装
1
2
3
4
5
6
7
8
9
10
11
12
13
14
sudo yum install -y yum-utils sudo yum-config-manager \ --add-repo \ https://download.docker.com/linux/centos/docker-ce.repo sudo yum install docker-ce docker-ce-cli containerd.io docker-buildx-plugin docker-compose-plugin sudo systemctl enable docker --now # 测试工作 docker ps # 批量安装所有软件 docker compose
创建/prod文件夹,准备以下文件
prometheus.yml
1
2
3
4
5
6
7
8
9
10
11
12
13
14
15
16
global: scrape_interval: 15s evaluation_interval: 15s scrape_configs: - job_name: 'prometheus' static_configs: - targets: ['localhost:9090' ] - job_name: 'redis' static_configs: - targets: ['redis:6379' ] - job_name: 'kafka' static_configs: - targets: ['kafka:9092' ]
docker-compose.yml
1
2
3
4
5
6
7
8
9
10
11
12
13
14
15
16
17
18
19
20
21
22
23
24
25
26
27
28
29
30
31
32
33
34
35
36
37
38
39
40
41
42
43
44
45
46
47
48
49
50
51
52
53
54
55
56
57
58
59
60
61
62
63
64
65
66
67
68
69
70
71
72
73
74
75
76
version: '3.9' services: redis: image: redis:latest container_name: redis restart: always ports: - "6379:6379" networks: - backend zookeeper: image: bitnami/zookeeper:latest container_name: zookeeper restart: always environment: ZOOKEEPER_CLIENT_PORT: 2181 ZOOKEEPER_TICK_TIME: 2000 networks: - backend kafka: image: bitnami/kafka:3.4.0 container_name: kafka restart: always depends_on: - zookeeper ports: - "9092:9092" environment: ALLOW_PLAINTEXT_LISTENER: yes KAFKA_CFG_ZOOKEEPER_CONNECT: zookeeper:2181 KAFKA_OFFSETS_TOPIC_REPLICATION_FACTOR: 1 networks: - backend kafka-ui: image: provectuslabs/kafka-ui:latest container_name: kafka-ui restart: always depends_on: - kafka ports: - "8080:8080" environment: KAFKA_CLUSTERS_0_NAME: dev KAFKA_CLUSTERS_0_BOOTSTRAPSERVERS: kafka:9092 networks: - backend prometheus: image: prom/prometheus:latest container_name: prometheus restart: always volumes: - ./prometheus.yml:/etc/prometheus/prometheus.yml ports: - "9090:9090" networks: - backend grafana: image: grafana/grafana:latest container_name: grafana restart: always depends_on: - prometheus ports: - "3000:3000" networks: - backend networks: backend: name: backend
启动环境
1 docker compose -f docker-compose.yml up -d
验证
Redis:你的ip:6379
Kafka:你的ip:9092
Prometheus:你的ip:9090
Grafana:你的ip:3000
NoSQL Redis整合 场景整合 依赖导入
1 2 3 4 <dependency > <groupId > org.springframework.boot</groupId > <artifactId > spring-boot-starter-data-redis</artifactId > </dependency >
配置
1
2
3
spring.data.redis.host =192.168.96.136 spring.data.redis.port =6379 spring.data.redis.password =
测试
1
2
3
4
5
6
7
8
@Autowired StringRedisTemplate redisTemplate; @Test void redisTest () redisTemplate.opsForValue().set("a" ,"1234" ); Assertions.assertEquals("1234" ,redisTemplate.opsForValue().get("a" )); }
redisTemplate针对redis各种数据结构的方法
1 2 3 4 5 6 7 8 9 10 redisTemplate.opsForValue(); redisTemplate.opsForList(); redisTemplate.opsForSet(); redisTemplate.opsForZSet(); redisTemplate.opsForHash();
自动配置原理
\META-INF\spring\org.springframework.boot.autoconfigure.AutoConfiguration.imports中导入了RedisAutoConfiguration、RedisReactiveAutoConfiguration、RedisRepositoriesAutoConfiguration,所有属性绑定在RedisProperties中RedisReactiveAutoConfiguration属于响应式编程,RedisRepositoriesAutoConfiguration属于JPA操作RedisAutoConfiguration 配置了以下组件:
LettuceConnectionConfiguration:给容器中注入了连接工厂LettuceConnectionFactory和操作redis的客户端DefaultClientResources。RedisTemplate<Object, Object>:可以给redis中存储任意对象,默认使用jdk默认的序列化方式。StringRedisTemplate:给redis中存储字符串,如果要存对象,需要开发人员自己进行序列化,key-value都是字符进行操作。
定制化 序列化机制 1 2 3 4 5 6 7 8 9 10 11 12 13 14 15 16 17 18 @Configuration public class AppRedisConfiguration @Bean public RedisTemplate<Object, Object> redisTemplate (RedisConnectionFactory redisConnectionFactory) RedisTemplate<Object, Object> template = new RedisTemplate<>(); template.setConnectionFactory(redisConnectionFactory); template.setDefaultSerializer(new GenericJackson2JsonRedisSerializer()); return template; } }
redis客户端
RedisTemplate、StringRedisTemplate :操作redis的工具类
要从redis的连接工厂获取连接才能操作redis
redis客户端
Lettuce:默认
Jedis:可以使用以下切换
1 2 3 4 5 6 7 8 9 10 11 12 13 14 15 <dependency > <groupId > org.springframework.boot</groupId > <artifactId > spring-boot-starter-data-redis</artifactId > <exclusions > <exclusion > <groupId > io.lettuce</groupId > <artifactId > lettuce-core</artifactId > </exclusion > </exclusions > </dependency > <dependency > <groupId > redis.cliets</groupId > <artifactId > jedis</artifactId > </dependency >
配置参考 1 2 3 4 5 6 7 8 9 10 11 12 spring.data.redis.host =192.168.96.136 spring.data.redis.port =6379 spring.data.redis.client-type =jedis spring.data.redis.jedis.pool.enabled =true spring.data.redis.jedis.pool.max-active =8
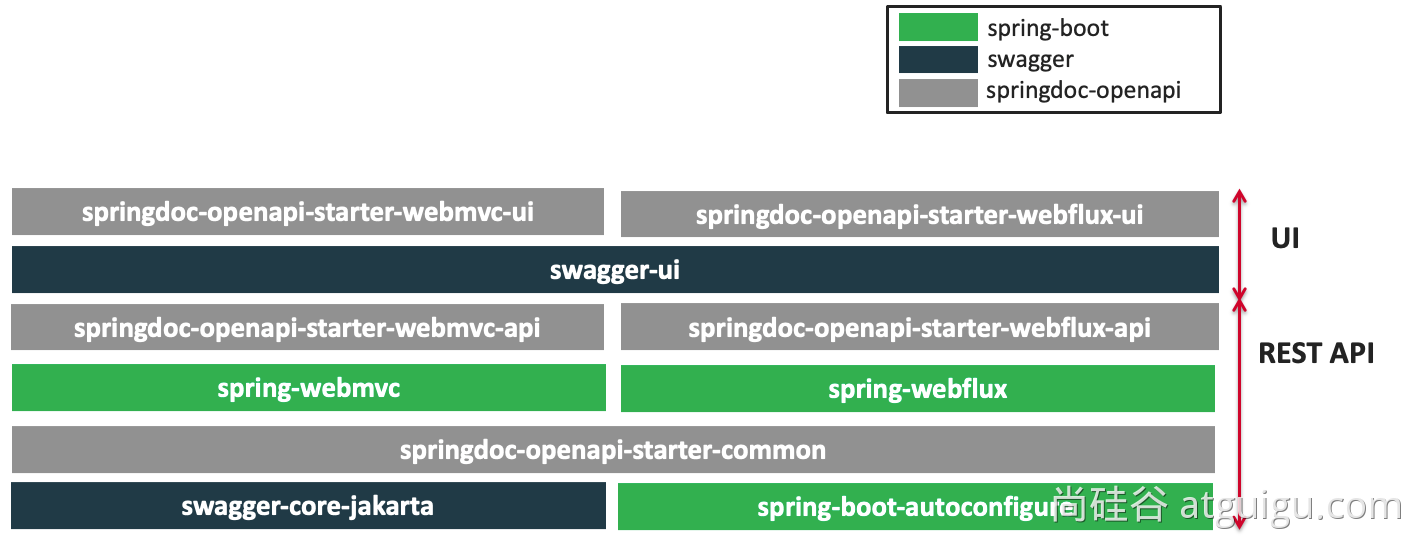
接口文档 OpenAPI3与Swagger
Swagger可以快速生成实时接口文档,方便前后端开发人员进行协调沟通,遵循OpenAPI规范。OpenAPI 3 Library for spring-boot (springdoc.org)
OpenAPI3架构
整合 导入场景
1 2 3 4 5 6 <dependency > <groupId > org.springdoc</groupId > <artifactId > springdoc-openapi-starter-webmvc-ui</artifactId > <version > 2.3.0</version > </dependency >
配置
1 2 3 4 5 6 7 8 springdoc.api-docs.path =/api-docs springdoc.swagger-ui.path =/swagger-ui.html springdoc.show-actuator =true
使用 常用注解
注解
标注位置
作用
@Tag
controller类
标识controller作用
@Parameter
参数
标识参数作用
@Parameters
参数
参数多重说明
@Schema
model层的JavaBean
描述模型作用以及每个属性
@Operation
方法
描述方法作用
@ApiResponse
方法
描述方法响应状态码等
Docket配置
如果有多个Docket,配置如下
1 2 3 4 5 6 7 8 9 10 11 12 13 14 15 16 @Bean public GroupedOpenApi publicApi () return GroupedOpenApi.builder() .group("springshop-public" ) .pathsToMatch("/public/**" ) .build(); } @Bean public GroupedOpenApi adminApi () return GroupedOpenApi.builder() .group("springshop-admin" ) .pathsToMatch("/admin/**" ) .addMethodFilter(method -> method.isAnnotationPresent(Admin.class)) .build(); }
如果只有一个Docket,可以配置如下
1 2 springdoc.packagesToScan =package1, package2 springdoc.pathsToMatch =/v1, /api/balance/**
OpenApi配置 1 2 3 4 5 6 7 8 9 10 11 @Bean public OpenAPI springShopOpenAPI () return new OpenAPI() .info(new Info().title("SpringShop API" ) .description("Spring shop sample application" ) .version("v0.0.1" ) .license(new License().name("Apache 2.0" ).url("http://springdoc.org" ))) .externalDocs(new ExternalDocumentation() .description("SpringShop Wiki Documentation" ) .url("https://springshop.wiki.github.org/docs" )); }
springFox迁移 注解变化
原注解
现注解
作用
@Api
@Tag
描述Controller
@ApiIgnore
@Parameter(hidden = true)
描述忽略操作
@ApiImplicitParam
@Parameter
描述参数
@ApiImplicitParams
@Parameters
描述参数
@ApiModel
@Schema
描述对象
@ApiModelProperty(hidden = true)
@Schema(accessMode = READ_ONLY)
描述对象属性
@ApiModelProperty
@Schema
描述对象属性
@ApiOperation(value = “foo”, notes = “bar”)
@Operation(summary = “foo”, description = “bar”)
描述方法
@ApiParam
@Parameter
描述参数
@ApiResponse(code = 404, message = “foo”)
@ApiResponse(responseCode = “404”, description = “foo”)
描述响应
Docket配置 以前写法 1 2 3 4 5 6 7 8 9 10 11 12 13 14 15 16 17 18 19 20 21 22 @Bean public Docket publicApi () return new Docket(DocumentationType.SWAGGER_2) .select() .apis(RequestHandlerSelectors.basePackage("org.github.springshop.web.public" )) .paths(PathSelectors.regex("/public.*" )) .build() .groupName("springshop-public" ) .apiInfo(apiInfo()); } @Bean public Docket adminApi () return new Docket(DocumentationType.SWAGGER_2) .select() .apis(RequestHandlerSelectors.basePackage("org.github.springshop.web.admin" )) .paths(PathSelectors.regex("/admin.*" )) .apis(RequestHandlerSelectors.withMethodAnnotation(Admin.class)) .build() .groupName("springshop-admin" ) .apiInfo(apiInfo()); }
新写法 1 2 3 4 5 6 7 8 9 10 11 12 13 14 15 @Bean public GroupedOpenApi publicApi () return GroupedOpenApi.builder() .group("springshop-public" ) .pathsToMatch("/public/**" ) .build(); } @Bean public GroupedOpenApi adminApi () return GroupedOpenApi.builder() .group("springshop-admin" ) .pathsToMatch("/admin/**" ) .addOpenApiMethodFilter(method -> method.isAnnotationPresent(Admin.class)) .build(); }
添加OpenAPI组件 1 2 3 4 5 6 7 8 9 10 11 @Bean public OpenAPI springShopOpenAPI () return new OpenAPI() .info(new Info().title("SpringShop API" ) .description("Spring shop sample application" ) .version("v0.0.1" ) .license(new License().name("Apache 2.0" ).url("http://springdoc.org" ))) .externalDocs(new ExternalDocumentation() .description("SpringShop Wiki Documentation" ) .url("https://springshop.wiki.github.org/docs" )); }
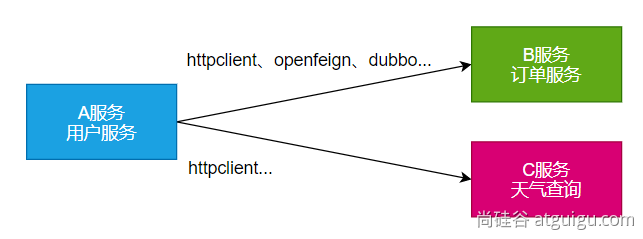
远程调用 RPC(Remote Procedure Call):远程过程调用 本地过程调用 :a(); b(); a(){b();};不同方法都在同一个JVM运行 远程过程调用:
服务提供者
服务消费者
通过连接对方服务器进行请求/响应,来实现调用效果
API/SDK的区别是什么?
api:接口(Application Programming Interface)
sdk:工具包(Software Development Kit)
开发过程中,我们经常需要调用别人写的功能
如果是内部微服务,可以通过依赖cloud、注册中心、openfeign等进行调用
如果是外部暴露的,可以发送http请求、或遵循外部协议进行调用
SpringBoot 整合提供了很多方式进行远程调用
轻量级客户端方式
RestTemplate:普通开发
RestClient:阻塞式
WebClient:响应式编程开发
Http Interface:声明式编程
Spring Cloud分布式解决方案方式
第三方框架
RestClient 创建与配置 引入依赖
1 2 3 4 5 <dependency > <groupId > org.springframework.boot</groupId > <artifactId > spring-boot-starter-web</artifactId > </dependency >
创建RestClient
1 2 3 4 5 6 RestClient restClient = RestClient.create("http://127.0.0.1:8081/get" ); RestClient restClient = RestClient.builder().baseUrl("http://127.0.0.1:8081/get" ).build(); RestClient restClient = RestClient.builder().build();
更多参数可以参考WebClient
获取响应 通过retrieve()方法来声明如何提取响应数据。
1 2 3 4 5 6 7 8 9 RestClient restClient = RestClient.create("http://127.0.0.1:8081" ); ResponseEntity<Person> entity = restClient.post().uri("/get" ) .contentType(MediaType.APPLICATION_JSON) .body(person).retrieve().toEntity(Person.class); Person person1 = restClient.post().uri("/get" ) .contentType(MediaType.APPLICATION_JSON) .body(person).retrieve().body(Person.class);
定义请求体 1 2 3 4 5 6 7 8 9 10 11 12 13 14 15 String name = "小红书" ; Map<String,Object> map = new HashMap<>(); map.put("name" ,name); Person person1 = restClient.post().uri("/{name}/get" , "小红书" ) .header("" ,"" ) .contentType(MediaType.APPLICATION_JSON) .body(person) .retrieve() .body(Person.class);
WebClient
非阻塞、响应式HTTP客户端
创建与配置 发请求:
请求方式:GET/POST/DELETE/XXX
请求路径:/xxx
请求参数:aa=bb&cc=dd&xxx
请求头:aa=bb,cc=dd
请求体
创建WebClient非常简单:
WebClient.create()WebClient.create(String baseUrl)WebClient.builder()配置更多参数项:uriBuilderFactory():自定义uriBuilderFactory,定义baseUrldefaultUriVariables() :默认url变量defaultHeader():每个请求默认头defaultCookie():每个请求默认CookiedefaultRequest():Consumer自定义每个请求filter():过滤client发送的每个请求exchangeStrategies():HTTP消息 reader/writer 自定义clientConnector():HTTP client库设置
1 WebClient client = WebClient.create("https://example.org" );
获取响应 retrieve() 方法用来声明如何提取响应数据,比如
1 2 3 4 5 6 7 8 9 10 11 12 13 14 15 16 17 18 19 20 21 22 23 24 25 26 27 28 29 WebClient client = WebClient.create("https://example.org" ); Mono<ResponseEntity<Person>> result = client.get() .uri("/persons/{id}" , id).accept(MediaType.APPLICATION_JSON) .retrieve() .toEntity(Person.class); WebClient client = WebClient.create("https://example.org" ); Mono<Person> result = client.get() .uri("/persons/{id}" , id).accept(MediaType.APPLICATION_JSON) .retrieve() .bodyToMono(Person.class); Flux<Quote> result = client.get() .uri("/quotes" ).accept(MediaType.TEXT_EVENT_STREAM) .retrieve() .bodyToFlux(Quote.class); Mono<Person> result = client.get() .uri("/persons/{id}" , id).accept(MediaType.APPLICATION_JSON) .retrieve() .onStatus(HttpStatus::is4xxClientError, response -> ...) .onStatus(HttpStatus::is5xxServerError, response -> ...) .bodyToMono(Person.class);
定义请求体 1 2 3 4 5 6 7 8 9 10 11 12 13 14 15 16 17 18 19 20 21 22 23 24 25 26 27 28 29 Mono<Person> personMono = ... ; Mono<Void> result = client.post() .uri("/persons/{id}" , id) .contentType(MediaType.APPLICATION_JSON) .body(personMono, Person.class) .retrieve() .bodyToMono(Void.class); Flux<Person> personFlux = ... ; Mono<Void> result = client.post() .uri("/persons/{id}" , id) .contentType(MediaType.APPLICATION_STREAM_JSON) .body(personFlux, Person.class) .retrieve() .bodyToMono(Void.class); Person person = ... ; Mono<Void> result = client.post() .uri("/persons/{id}" , id) .contentType(MediaType.APPLICATION_JSON) .bodyValue(person) .retrieve() .bodyToMono(Void.class);
HTTP Interface
Spring允许我们通过定义接口的方式,给任意位置发送http请求,实现远程调用,可以用来简化HTTP远程访问,需要webflux场景才可(web场景可以使用RestClient)
导入依赖 1 2 3 4 <dependency > <groupId > org.springframework.boot</groupId > <artifactId > spring-boot-starter-webflux</artifactId > </dependency >
定义接口 1 2 3 4 public interface BingService @GetExchange(url = "/search") String search (@RequestParam("q") String keyword) ; }
创建代理&测试 WebClient 1 2 3 4 5 6 7 8 9 10 11 12 13 14 15 16 17 18 19 20 21 22 23 24 25 26 27 28 29 30 @SpringBootTest class Boot05TaskApplicationTests @Test void contextLoads () throws InterruptedException WebClient client = WebClient.builder() .baseUrl("https://cn.bing.com" ) .codecs(clientCodecConfigurer -> { clientCodecConfigurer .defaultCodecs() .maxInMemorySize(256 *1024 *1024 ); }) .build(); HttpServiceProxyFactory factory = HttpServiceProxyFactory .builder(WebClientAdapter.forClient(client)).build(); BingService bingService = factory.createClient(BingService.class); Mono<String> search = bingService.search("尚硅谷" ); System.out.println("==========" ); search.subscribe(str -> System.out.println(str)); Thread.sleep(100000 ); } }
RestClient 1 2 3 4 HttpServiceProxyFactory factory = HttpServiceProxyFactory.builder().exchangeAdapter(RestClientAdapter.create(RestClient.builder().build())).build(); PersonInterface personInterface = factory.createClient(PersonInterface.class) Person person = personInterface.get();
消息服务 Apache Kafka
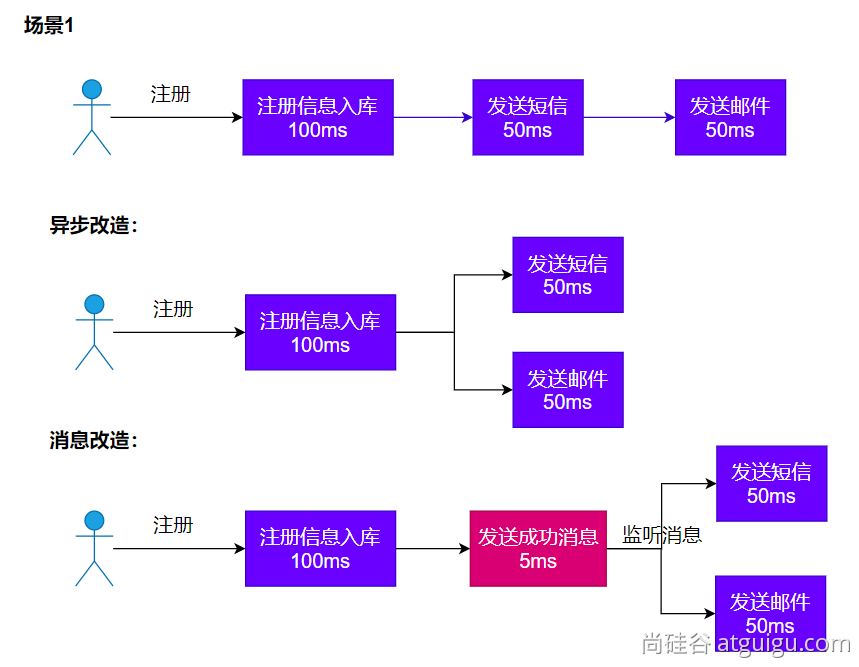
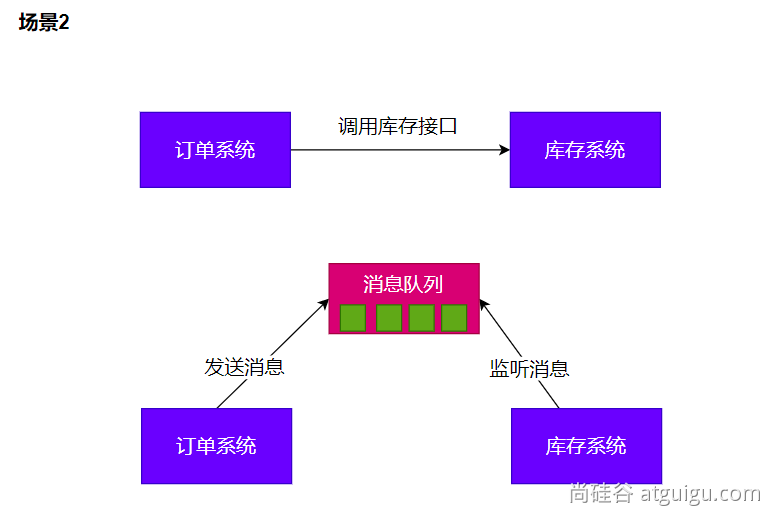
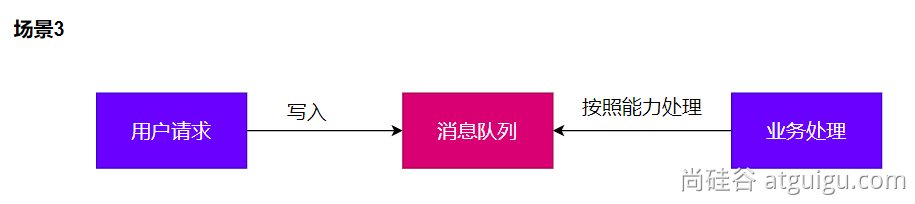
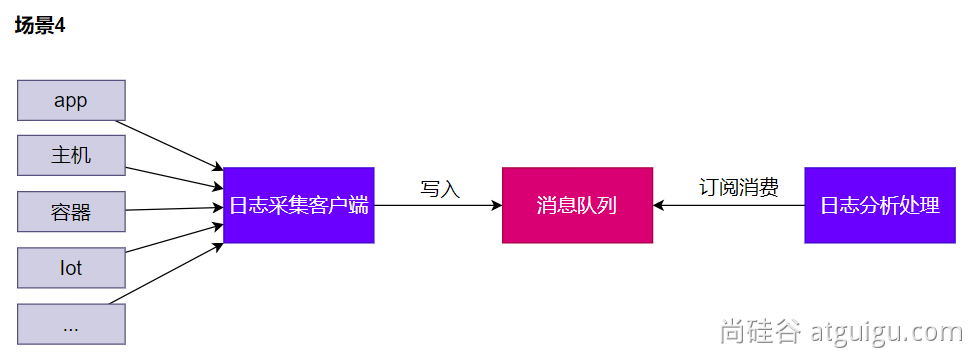
消息队列-场景 异步
解耦
削峰
缓冲
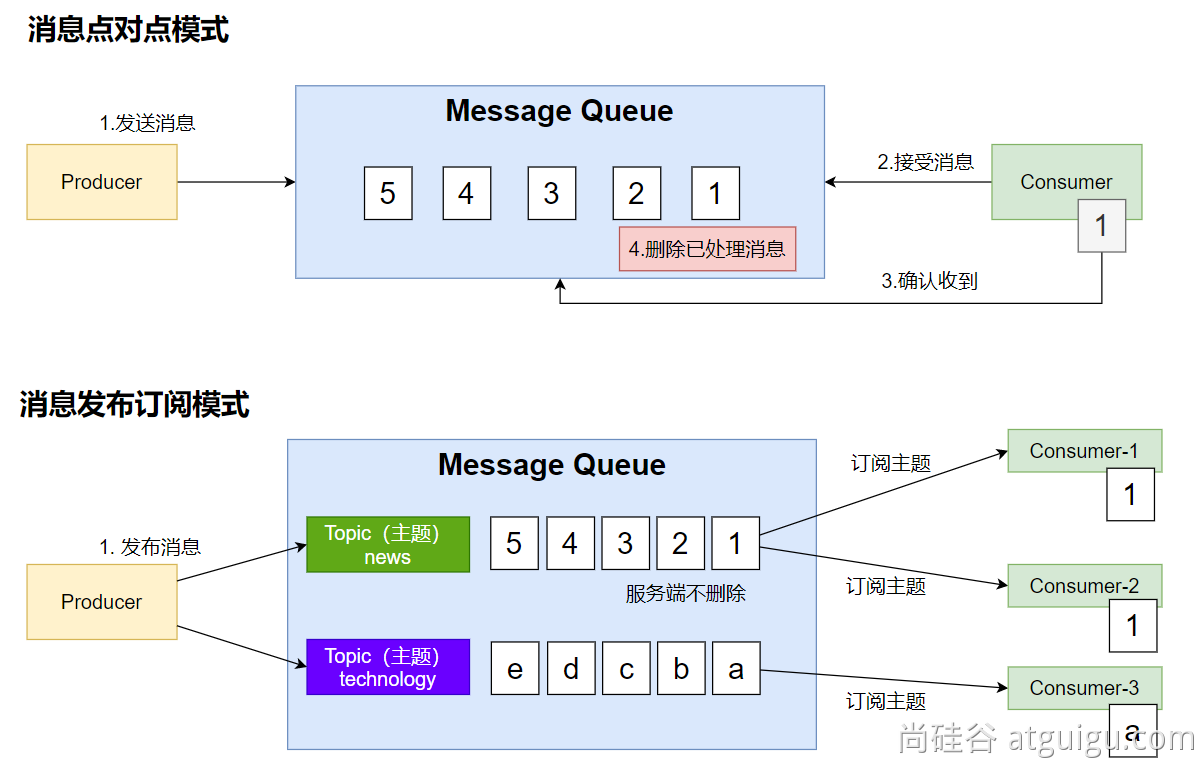
消息队列-Kafka 消息模式
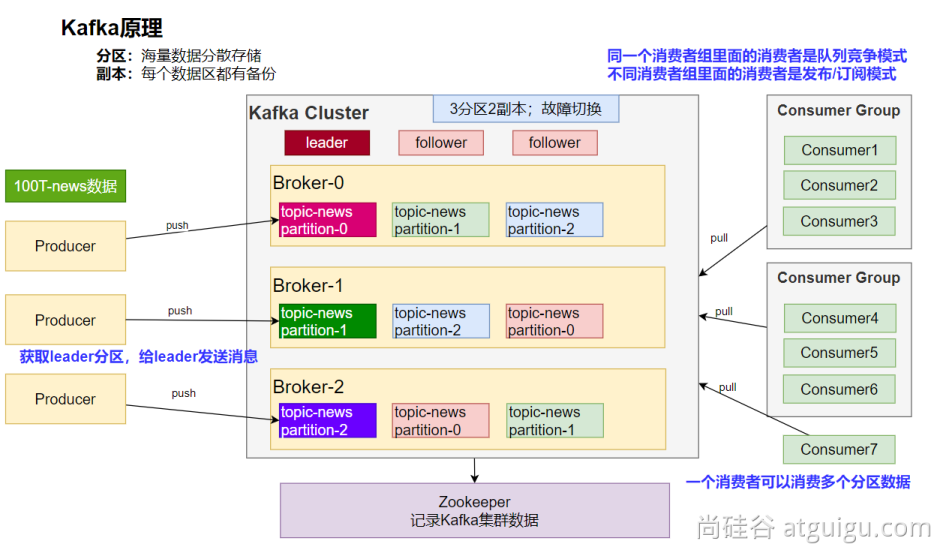
Kafka工作原理
SpringBoot整合 Spring Kafka
1 2 3 4 <dependency > <groupId > org.springframework.kafka</groupId > <artifactId > spring-kafka</artifactId > </dependency >
配置
1 spring.kafka.bootstrap-servers =192.168.96.136:9092
消息发送 1 2 3 4 5 6 7 8 9 10 11 12 13 14 15 16 17 18 19 @SpringBootTest class Boot07KafkaApplicationTests @Autowired KafkaTemplate kafkaTemplate; @Test void contextLoads () throws ExecutionException, InterruptedException StopWatch watch = new StopWatch(); watch.start(); CompletableFuture[] futures = new CompletableFuture[10000 ]; for (int i = 0 ; i < 10000 ; i++) { CompletableFuture send = kafkaTemplate.send("order" , "order.create." +i, "订单创建了:" +i); futures[i]=send; } CompletableFuture.allOf(futures).join(); watch.stop(); System.out.println("总耗时:" +watch.getTotalTimeMillis()); } }
1 2 3 4 5 6 7 8 9 10 11 12 13 14 15 16 import org.springframework.kafka.core.KafkaTemplate;import org.springframework.stereotype.Component;@Component public class MyBean private final KafkaTemplate<String, String> kafkaTemplate; public MyBean (KafkaTemplate<String, String> kafkaTemplate) this .kafkaTemplate = kafkaTemplate; } public void someMethod () this .kafkaTemplate.send("someTopic" , "Hello" ); } }
消息监听 1 2 3 4 5 6 7 8 9 10 11 12 13 14 15 16 17 @Component public class OrderMsgListener @KafkaListener(topics = "order",groupId = "order-service") public void listen (ConsumerRecord record) System.out.println("收到消息:" +record); } @KafkaListener(groupId = "order-service-2",topicPartitions = { @TopicPartition(topic = "order",partitionOffsets = { @PartitionOffset(partition = "0",initialOffset = "0") }) }) public void listenAll (ConsumerRecord record) System.out.println("收到partion-0消息:" +record); } }
参数配置 消费者
1 2 3 spring.kafka.consumer.value-deserializer =org.springframework.kafka.support.serializer.JsonDeserializer spring.kafka.consumer.properties[spring.json.value.default.type] =com.example.Invoice spring.kafka.consumer.properties[spring.json.trusted.packages] =com.example.main,com.example.another
生产者
1 2 3 spring.kafka.producer.value-serializer =org.springframework.kafka.support.serializer.JsonSerializer spring.kafka.producer.properties[spring.json.add.type.headers] =false
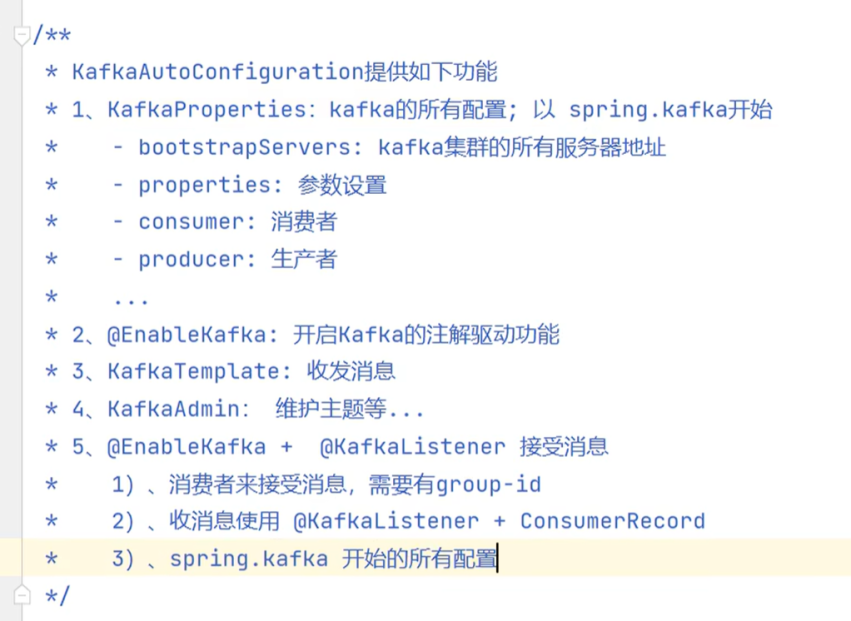
自动配置原理 kafka 自动配置在`KafkaAutoConfiguration
容器中放了 KafkaTemplate 可以进行消息收发
容器中放了 KafkaAdmin 可以进行 Kafka 的管理,比如创建 topic 等
kafka 的配置在 KafkaProperties 中
@EnableKafka可以开启基于注解的模式
web安全
Apache Shiro
Spring Security
自研:Filter
Spring Security 安全架构 认证:Authentication
who are you? 你是谁
授权:Authorization
what are you allowed to do? 你能做什么?
攻击防护
XSS(Cross-site scripting)
CSRF(Cross-site request forgery)
CORS(Cross-Origin Resource Sharimg)
SQL注入
…
扩展:权限模型 BAC(Role Based Access Controll) 用户 -> 角色 -> 权限
一个用户拥有一个或者多个角色,每个角色下拥有不同的权限。
ACL(Access Controll List) 用户 -> 权限
用户直接和权限对应,直接给用户分配对应权限。
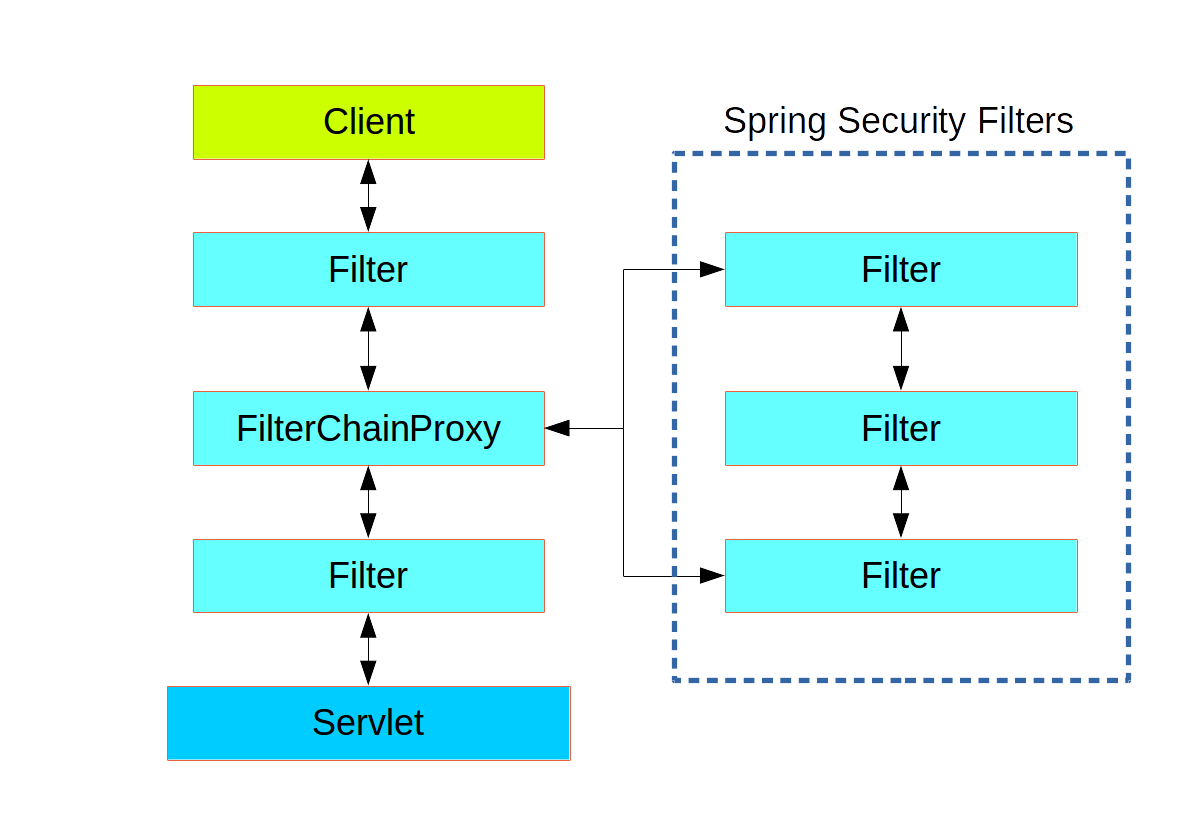
Spring Security原理 过滤器链架构
Spring Security 利用 FilterChainProxy 封装一系列拦截器链,实现各种安全拦截功能。Servlet、Filter、Listenter
当接收到一个请求,会经过各种Filter,也会经过Security提供的FilterChainProxy(过滤器链)。
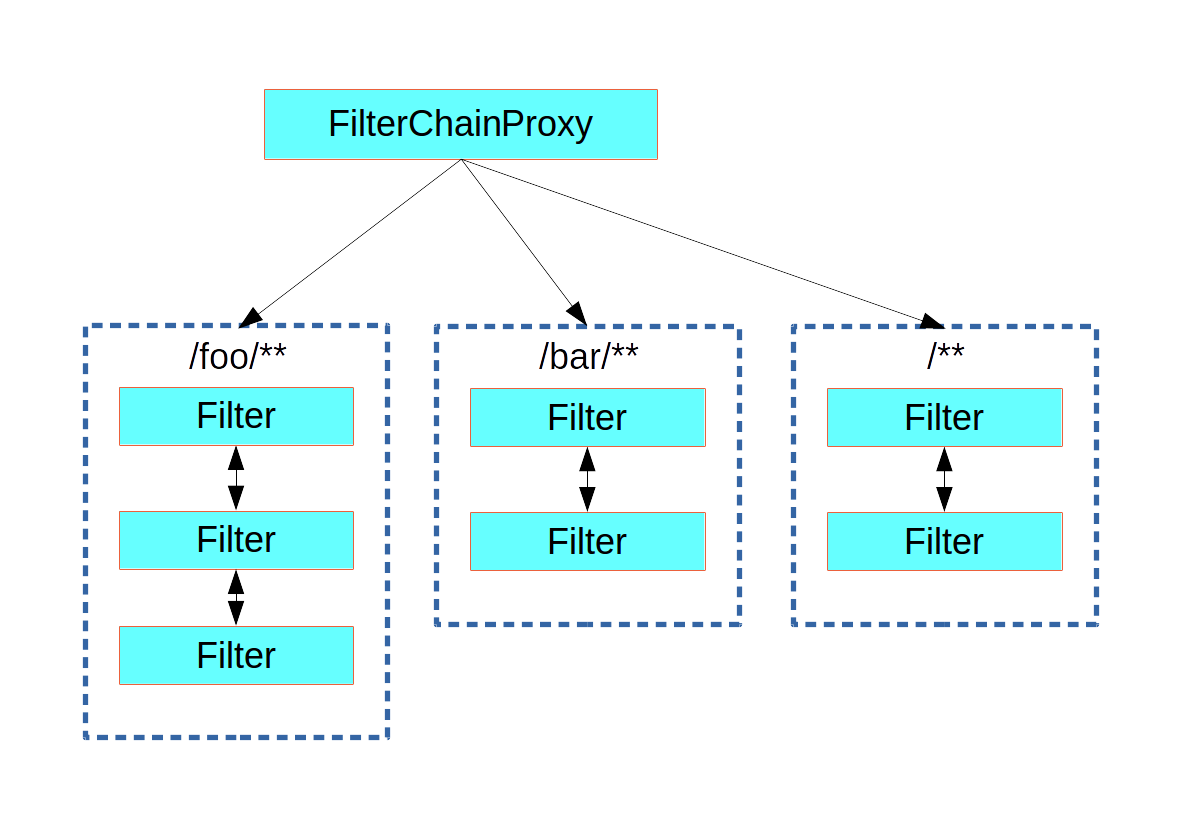
FilterChainProxy FilterChainProxy 过滤器链,允许用户针对不同的请求定义不同的过滤器链。
SecurityFilterChain
使用 HttpSecurity 早期版本的Security需要实现WebSecurityConfigurerAdapter接口,才能操作HttpSecurity,最新版的只需要直接注入即可。
1 2 3 4 5 6 7 8 9 10 11 12 13 14 15 @Configuration @Order(SecurityProperties.BASIC_AUTH_ORDER - 10) public class ApplicationConfigurerAdapter @Bean public SecurityFilterChain securityFilterChain (HttpSecurity http) throws Exception http.authorizeHttpRequests((request) -> { request.requestMatchers("/match1/user" ).hasRole("USER" ) .requestMatchers("/match2/spam" ).hasRole("SPAM" ) .anyRequest().authenticated(); }); return http.build(); } }
MethodSecurity 1 2 3 4 5 6 7 8 9 10 11 12 13 14 15 @SpringBootApplication @EnableGlobalMethodSecurity(securedEnabled = true) public class SampleSecureApplication } @Service public class MyService @Secured("ROLE_USER") public String secure () return "Hello Security" ; } }
核心:
@EnableMethodSecurity :开启全局方法安全配置
@Secured:方法鉴权(不常用)@PreAuthorize:方法鉴权,在方法调用之前@PostAuthorize:方法鉴权,在方法调用之后
UserDetailsService:
去数据库查询用户详细信息的service(用户基本信息、用户角色、用户权限)
Security场景的自动配置类:
SecurityAutoConfiguration
Security有关的配置在:SecurityProperties,以spring.security开头
SpringBootWebSecurityConfiguration
默认的 SecurityFilterChain ,提供了一些默认的安全策略
所有的请求都需要认证
开启了表单登录
开启了httpbasic登录
@EnableWebSecurity 生效
WebSecurityConfiguration
SpringWebMvcImportSelectorOAuth2ImportSelectorHttpSecurityConfiguration
@EnableGlobalAuthentication
开启全局认证(生效)
AuthenticationConfiguration
SecurityDataConfiguration 未生效
SecurityFilterAutoConfiguration
实战 引入依赖 1 2 3 4 5 6 7 8 9 10 11 12 13 14 15 16 17 18 19 20 21 22 23 24 25 26 27 28 29 30 31 32 33 34 35 36 37 38 39 40 41 42 43 44 45 46 47 48 49 50 51 52 53 54 <dependency > <groupId > org.springframework.boot</groupId > <artifactId > spring-boot-starter-data-redis</artifactId > </dependency > <dependency > <groupId > org.springframework.boot</groupId > <artifactId > spring-boot-starter-thymeleaf</artifactId > </dependency > <dependency > <groupId > org.springframework.boot</groupId > <artifactId > spring-boot-starter-security</artifactId > </dependency > <dependency > <groupId > org.springframework.boot</groupId > <artifactId > spring-boot-starter-web</artifactId > </dependency > <dependency > <groupId > org.mybatis.spring.boot</groupId > <artifactId > mybatis-spring-boot-starter</artifactId > <version > 3.0.0</version > </dependency > <dependency > <groupId > org.springframework.boot</groupId > <artifactId > spring-boot-devtools</artifactId > <scope > runtime</scope > <optional > true</optional > </dependency > <dependency > <groupId > com.mysql</groupId > <artifactId > mysql-connector-j</artifactId > <scope > runtime</scope > </dependency > <dependency > <groupId > org.projectlombok</groupId > <artifactId > lombok</artifactId > <optional > true</optional > </dependency > <dependency > <groupId > org.springframework.boot</groupId > <artifactId > spring-boot-starter-test</artifactId > <scope > test</scope > </dependency > <dependency > <groupId > org.thymeleaf.extras</groupId > <artifactId > thymeleaf-extras-springsecurity6</artifactId > <version > 3.1.1.RELEASE</version > </dependency > <dependency > <groupId > org.springframework.security</groupId > <artifactId > spring-security-test</artifactId > <scope > test</scope > </dependency >
页面 首页 1 <p > Click <a th:href ="@{/hello}" > here</a > to see a greeting.</p >
Hello页 登录页 1 2 3 4 5 6 7 8 9 10 11 12 13 14 15 16 17 18 19 <!DOCTYPE html > <html xmlns ="http://www.w3.org/1999/xhtml" xmlns:th ="https://www.thymeleaf.org" > <head > <title > Spring Security Example</title > </head > <body > <div th:if ="${param.error}" > Invalid username and password.</div > <div th:if ="${param.logout}" > You have been logged out.</div > <form th:action ="@{/login}" method ="post" > <div > <label > User Name : <input type ="text" name ="username" /> </label > </div > <div > <label > Password: <input type ="password" name ="password" /> </label > </div > <div > <input type ="submit" value ="Sign In" /> </div > </form > </body > </html >
配置类 视图控制 1 2 3 4 5 6 7 8 9 10 11 12 13 14 15 16 package com.example.securingweb;import org.springframework.context.annotation.Configuration;import org.springframework.web.servlet.config.annotation.ViewControllerRegistry;import org.springframework.web.servlet.config.annotation.WebMvcConfigurer;@Configuration public class MvcConfig implements WebMvcConfigurer public void addViewControllers (ViewControllerRegistry registry) registry.addViewController("/home" ).setViewName("index" ); registry.addViewController("/" ).setViewName("index" ); registry.addViewController("/hello" ).setViewName("hello" ); registry.addViewController("/login" ).setViewName("login" ); } }
Security配置 1 2 3 4 5 6 7 8 9 10 11 12 13 14 15 16 17 18 19 20 21 22 23 24 25 26 27 28 29 30 31 32 33 34 35 36 37 38 39 40 41 42 43 44 45 46 47 48 49 50 51 package com.atguigu.security.config;import org.springframework.context.annotation.Bean;import org.springframework.context.annotation.Configuration;import org.springframework.security.config.annotation.web.builders.HttpSecurity;import org.springframework.security.config.annotation.web.configuration.EnableWebSecurity;import org.springframework.security.core.userdetails.User;import org.springframework.security.core.userdetails.UserDetails;import org.springframework.security.core.userdetails.UserDetailsService;import org.springframework.security.provisioning.InMemoryUserDetailsManager;import org.springframework.security.web.SecurityFilterChain;@Configuration @EnableWebSecurity public class WebSecurityConfig @Bean public SecurityFilterChain securityFilterChain (HttpSecurity http) throws Exception http .authorizeHttpRequests((requests) -> requests .requestMatchers("/" , "/home" ).permitAll() .anyRequest().authenticated() ) .formLogin((form) -> form .loginPage("/login" ) .permitAll() ) .logout((logout) -> logout.permitAll()); return http.build(); } @Bean public UserDetailsService userDetailsService () UserDetails user = User.withDefaultPasswordEncoder() .username("admin" ) .password("admin" ) .roles("USER" ) .build(); return new InMemoryUserDetailsManager(user); } }
改造Hello页 1 2 3 4 5 6 7 8 9 10 11 12 13 14 15 16 17 18 <!DOCTYPE html > <html xmlns ="http://www.w3.org/1999/xhtml" xmlns:th ="https://www.thymeleaf.org" xmlns:sec ="https://www.thymeleaf.org/thymeleaf-extras-springsecurity6" > <head > <title > Hello World!</title > </head > <body > <h1 th:inline ="text" > Hello <span th:remove ="tag" sec:authentication ="name" > thymeleaf</span > ! </h1 > <form th:action ="@{/logout}" method ="post" > <input type ="submit" value ="Sign Out" /> </form > </body > </html >
可观测性
可观测性 Observability
对线上应用进行观测、监控、预警….
健康状态【组件状态、存活状态】Health
运行指标【cpu、内存、垃圾收集、吞吐量、响应成功率】Metrics
链路追踪
…SpringBoot Actuator
实战 场景引入 1 2 3 4 <dependency > <groupId > org.springframework.boot</groupId > <artifactId > spring-boot-starter-actuator</artifactId > </dependency >
暴露指标 1 2 3 4 5 6 management: endpoints: enabled-by-default: true web: exposure: include: '*'
访问数据
Endpoint 常用端点
ID
描述
auditevents暴露当前应用程序的审核事件信息。需要一个AuditEventRepository组件。
beans显示应用程序中所有Spring Bean的完整列表。
caches暴露可用的缓存。
conditions显示自动配置的所有条件信息,包括匹配或不匹配的原因。
configprops显示所有@ConfigurationProperties。
env暴露Spring的属性ConfigurableEnvironment
flyway显示已应用的所有Flyway数据库迁移。 Flyway组件。
health显示应用程序运行状况信息。
httptrace显示HTTP跟踪信息(默认情况下,最近100个HTTP请求-响应)。需要一个HttpTraceRepository组件。
info显示应用程序信息。
integrationgraph显示Spring integrationgraph 。需要依赖spring-integration-core。
loggers显示和修改应用程序中日志的配置。
liquibase显示已应用的所有Liquibase数据库迁移。需要一个或多个Liquibase组件。
metrics显示当前应用程序的“指标”信息。
mappings显示所有@RequestMapping路径列表。
scheduledtasks显示应用程序中的计划任务。
sessions允许从Spring Session支持的会话存储中检索和删除用户会话。需要使用Spring Session的基于Servlet的Web应用程序。
shutdown使应用程序正常关闭。默认禁用。
startup显示由ApplicationStartup收集的启动步骤数据。需要使用SpringApplication进行配置BufferingApplicationStartup。
threaddump执行线程转储。
heapdump返回hprof堆转储文件。
jolokia通过HTTP暴露JMX bean(需要引入Jolokia,不适用于WebFlux)。需要引入依赖jolokia-core。
logfile返回日志文件的内容(如果已设置logging.file.name或logging.file.path属性)。支持使用HTTPRange标头来检索部分日志文件的内容。
prometheus以Prometheus服务器可以抓取的格式公开指标。需要依赖micrometer-registry-prometheus。
重要端点:threaddump、heapdump、metrics
定制端点
HealthEndpoint 1 2 3 4 5 6 7 8 9 10 11 12 13 14 15 16 17 18 19 20 21 22 23 24 import org.springframework.boot.actuate.health.Health;import org.springframework.boot.actuate.health.HealthIndicator;import org.springframework.stereotype.Component;@Component public class MyHealthIndicator implements HealthIndicator @Override public Health health () int errorCode = check(); if (errorCode != 0 ) { return Health.down().withDetail("Error Code" , errorCode).build(); } return Health.up().build(); } } 构建Health Health build = Health.down() .withDetail("msg" , "error service" ) .withDetail("code" , "500" ) .withException(new RuntimeException()) .build();
1 2 3 4 5 management: endpoint: health: enabled: true show-details: always
1 2 3 4 5 6 7 8 9 10 11 12 13 14 15 16 17 18 19 20 21 22 23 24 25 26 27 28 29 30 31 @Component public class MyComHealthIndicator extends AbstractHealthIndicator @Override protected void doHealthCheck (Health.Builder builder) throws Exception Map<String,Object> map = new HashMap<>(); if (1 == 2 ){ builder.status(Status.UP); map.put("count" ,1 ); map.put("ms" ,100 ); }else { builder.status(Status.OUT_OF_SERVICE); map.put("err" ,"连接超时" ); map.put("ms" ,3000 ); } builder.withDetail("code" ,100 ) .withDetails(map); } }
MetricsEndpoint 1 2 3 4 5 6 7 8 9 10 class MyService Counter counter; public MyService (MeterRegistry meterRegistry) counter = meterRegistry.counter("myservice.method.running.counter" ); } public void hello () counter.increment(); } }
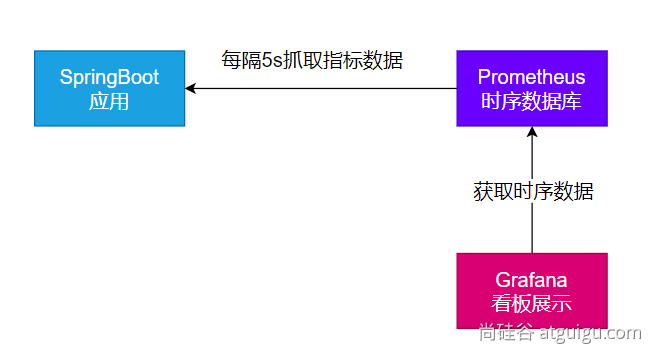
监控案例落地
安装 Prometheus + Grafana 1 2 3 4 5 6 7 # 安装prometheus:时序数据库 docker run -p 9090:9090 -d \ -v pc:/etc/prometheus \ prom/prometheus # 安装grafana;默认账号密码 admin:admin docker run -d --name=grafana -p 3000:3000 grafana/grafana
导入依赖 1 2 3 4 5 6 7 8 9 <dependency > <groupId > org.springframework.boot</groupId > <artifactId > spring-boot-starter-actuator</artifactId > </dependency > <dependency > <groupId > io.micrometer</groupId > <artifactId > micrometer-registry-prometheus</artifactId > <version > 1.10.6</version > </dependency >
1 2 3 4 5 management: endpoints: web: exposure: include: '*'
访问: http://localhost:8001/actuator/prometheus 验证,返回 prometheus 格式的所有指标
1 2 3 4 5 6 7 8 9 10 11 12 13 14 15 16 17 18 19 20 # 安装上传工具 yum install lrzsz # 安装openjdk # 下载openjdk wget https://download.oracle.com/java/17/latest/jdk-17_linux-x64_bin.tar.gz mkdir -p /opt/java tar -xzf jdk-17_linux-x64_bin.tar.gz -C /opt/java/ sudo vi /etc/profile # 加入以下内容 export JAVA_HOME=/opt/java/jdk-17.0.7 export PATH=$PATH:$JAVA_HOME/bin # 环境变量生效 source /etc/profile # 后台启动java应用 nohup java -jar boot3-14-actuator-0.0.1-SNAPSHOT.jar > output.log 2>&1 &
确认可以访问到: http://192.18.96.136:9999/actuator/prometheus
配置Prometheus拉取数据 1 2 3 4 5 6 7 8 scrape_configs: - job_name: 'spring-boot-actuator-exporter' metrics_path: '/actuator/prometheus' static_configs: - targets: ['192.168.200.1:8001' ] labels: nodename: 'app-demo'
配置 Grafana 监控面板
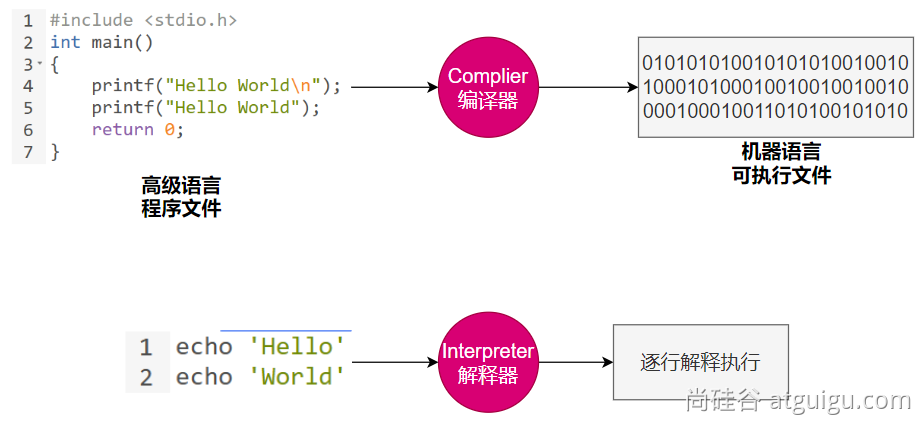
AOT AOT与JIT AOT :Ahead-of-Time(提取编译 ):程序执行前,全部被编译成机器码JIT :Just in Time(即时编译 ):程序边编译,边运行
编译:
源代码(.c、.cpp、.go、.java…)===> 编译 ===> 机器码
语言:
Complier 与 Interpreter Java:半编译半解释在线编程
对比项
编译器
解释器
机器执行速度 快 ,因为源代码只需被转换一次慢 ,因为每行代码都需要被解释执行
开发效率 慢 ,因为需要耗费大量时间编译快 ,无需花费时间生成目标代码,更快的开发和测试
调试 难以调试 编译器生成的目标代码容易调试 源代码,因为解释器一行一行地执行
可移植性(跨平台) 不同平台需要重新编译目标平台代码
同一份源码可以跨平台执行,因为每个平台会开发对应的解释器
学习难度 相对较高,需要了解源代码、编译器以及目标机器的知识
相对较低,无需了解机器的细节
错误检查 编译器可以在编译代码时检查错误
解释器只能在执行代码时检查错误
运行时增强 无
可以动态增强
AOT与JIT对比
JIT
AOT
优点
1.具备实时调整 能力 最优机器指令 优化内存占用
1.速度快,优化了运行时编译时间和内存消耗
缺点
1.运行期边编译速度慢 最高性能
1.程序第一次编译占用时间长 高级语言 一些特性
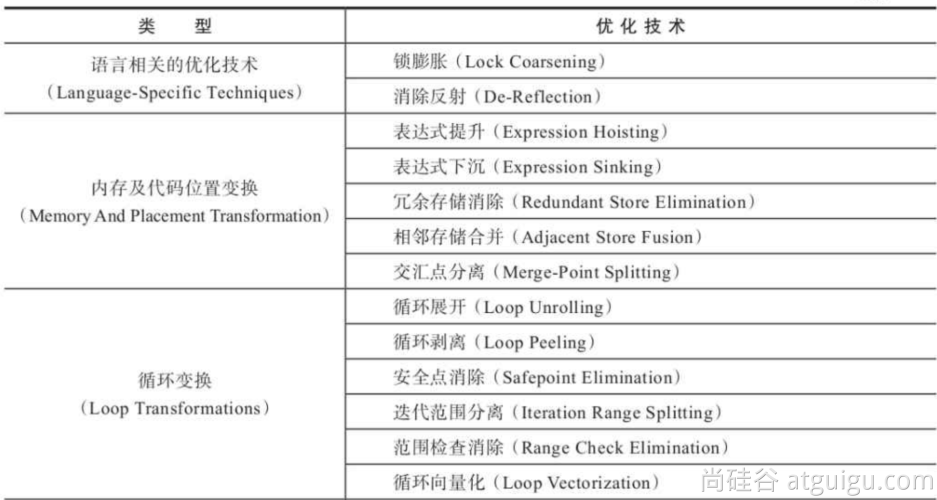
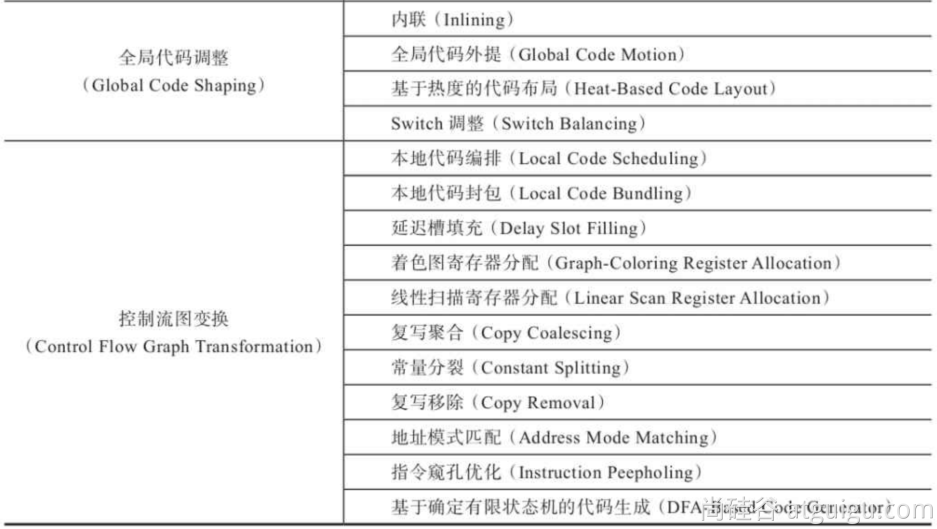
在OpenJDK的官方Wiki上,介绍了HotSpot虚拟机一个相对全面的、即时编译器(JIT) 中采用的优化技术列表
可使用:-XX:+PrintCompilation 打印JIT编译信息
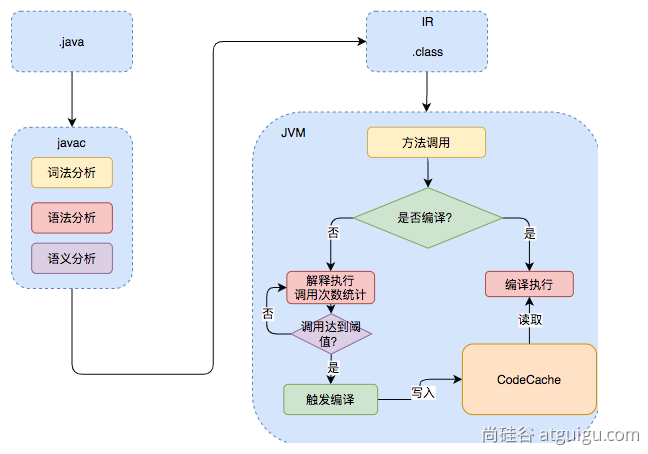
JVM架构 .java ====> .class ====> 机器码
JVM:既有解释器,又有编译器(JIT:即时编译)
Java的执行过程 建议阅读:
流程概要
详细流程 热点代码:调用次数非常多的代码
JVM编译器 JVM中集成了两种编译器,Client Compiler和Server Compiler
Client Compiler注重启动速度和局部的优化Server Compiler更加关注全局优化,性能更好,但
Client Compiler
HotSpot VM带有一个 Client Compiler C1编译器这种编译器启动速度快,但是性能比较 Server Compiler 来说会差一点
编译后的机器码执行效率没有C2的高
Server Compiler
HotSpot虚拟机中使用的Server Compiler有两种:C2和Graal
在HotSpot VM中,默认的Server Compiler是C2编译器
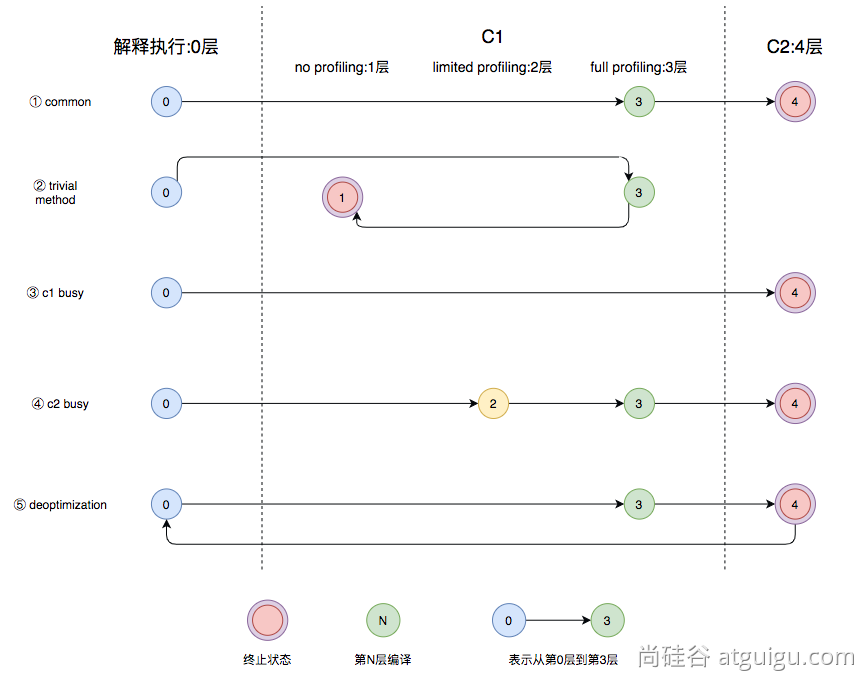
分层编译 Java7开始引入了分层编译(Tiered Compiler)的概念,它结合了C1和C2的优势,追求启动速度和峰值性能的一个平衡。分层编译将JVM的执行状态分为了五个层次,五个层次分别是:
解释执行;
执行不带profiling的C1代码;
执行仅带方法调用次数以及循环回边执行次数的profiling的C1代码;
执行带所有profiling的C1代码;
执行C2代码。
profiling就是收集能够反映程序执行状态的数据。其中最基本的统计数据就是方法的调用次数,以及循环回边的执行次数。
图中第①条路径,代表编译的一般情况,热点方法 从解释执行到被3层的C1编译,最后被4层的C2编译。
如果方法比较小 (比如java服务中常见的getter/setter 方法),3层的profiling没有收集到有价值的数据,JVM就会断定该方法对于C1代码和C2代码执行效率相同,就会执行图中第②条路径。在这种情况下,JVM会在3层编译之后,放弃进入C2编译,*直接选择用1层的C1编译运行 ***。
在C1忙碌 的情况下,执行图中第③条路径,在解释执行过程中对程序进行profiling ,根据信息直接由第4层的C2编译 。
前文中提到C1中的执行效率是1层>2层>3层 ,第3层 一般要比第2层 慢35%以上,所以在C2忙碌 的情况下,执行图中第④条路径。这时方法会被2层的C1编译,然后再被3层的C1编译,以减少方法在3层 的执行时间。
如果编译器 做了一些比较激进的优化 ,比如分支预测,在实际运行时发现预测出错 ,这时就会进行反优化 ,重新进入解释执行 ,图中第⑤条执行路径代码的就是反优化 。
总的来说,C1编译速度更快,C2的编译质量更高,分层编译的不同编译路径,也就是JVM根据当前服务的运行情况来寻找当前服务的最佳平衡点的一个过程。从JDK8开始,JVM默认开始分层编译。
存在的问题:
java应用如果用jar,解释执行,热点代码才编译成机器码;初始启动速度慢,初始处理请求数量少。
大型云平台,要求每一种应用都必须秒级启动,每个应用都要求效率高。
希望的效果:
java应用也能提前被编译成机器码,随时急速启动,一启动就急速运行,最高性能
编译成机器码的好处:
在其他服务器不需要安装Java环境,可以直接运行(同类型服务器)
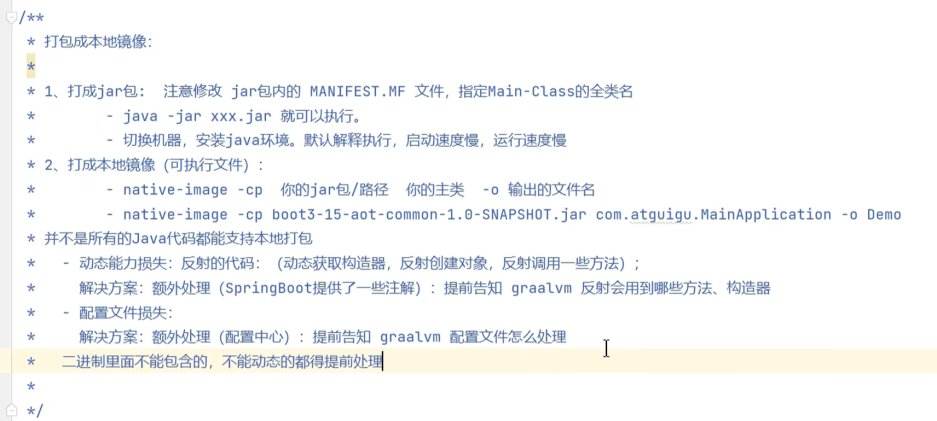
原生镜像:native-image (机器码、本地镜像)
把应用打包成能适配本机平台的可执行文件(机器码、本地镜像)
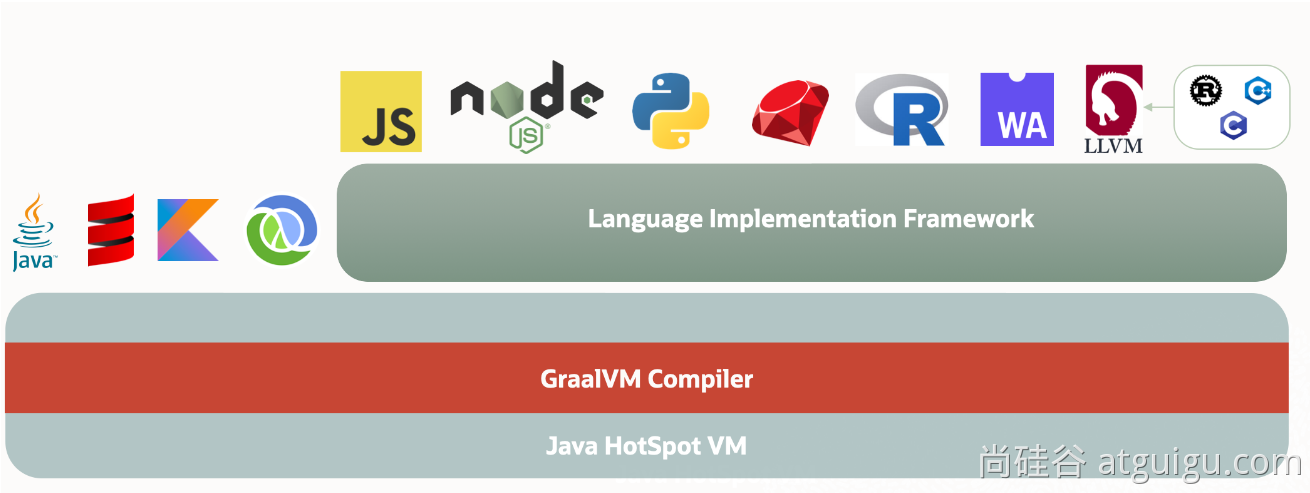
GeaalVM GraalVM
GraalVM 是一个高性能的JDK ,旨在加速 用Java和其他JVM语言编写的应用程序 的执行,同时还提供JavaScript、Python和许多其他流行语言的运行时。GraalVM 提供了两种 运行Java应用程序 的方式:
在HotSpot JVM上使用Graal即时(JIT) 编译器
作为预先编译(AOT) 的本机可执行文件 运行(本地镜像 )
架构
安装
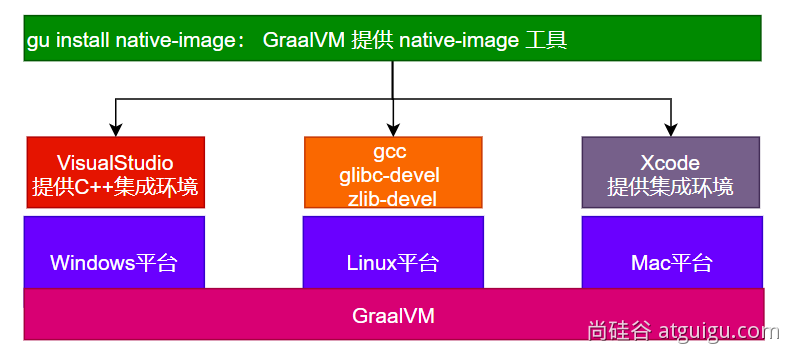
跨平台提供原生镜像原理
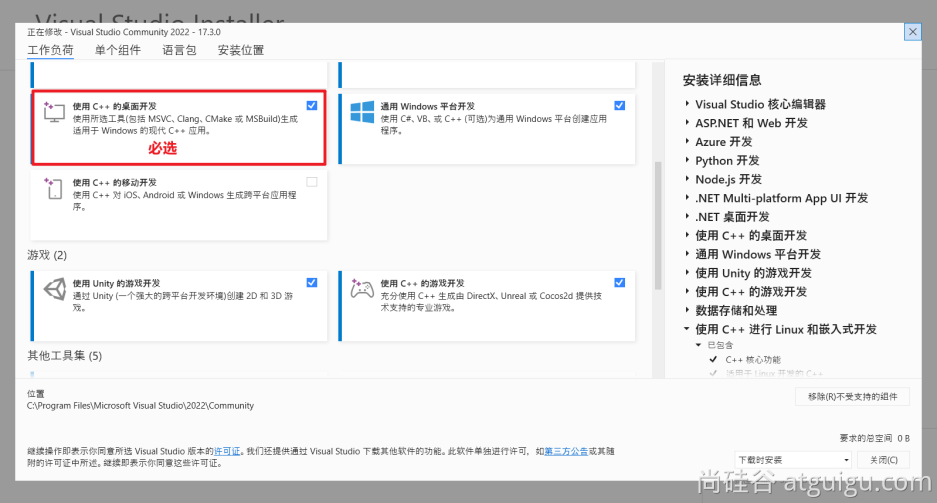
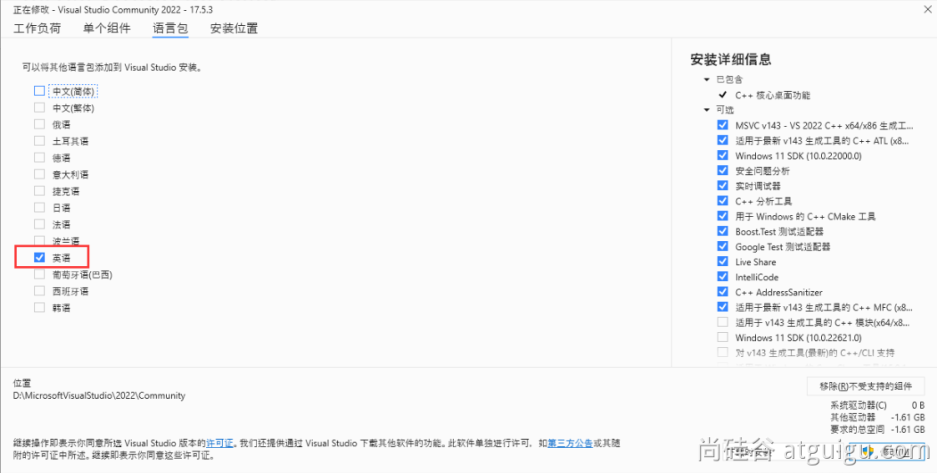
VisualStudio GraalVM在Window平台上打包原生镜像需要依赖于Visual Studio 环境
记住安装地址。
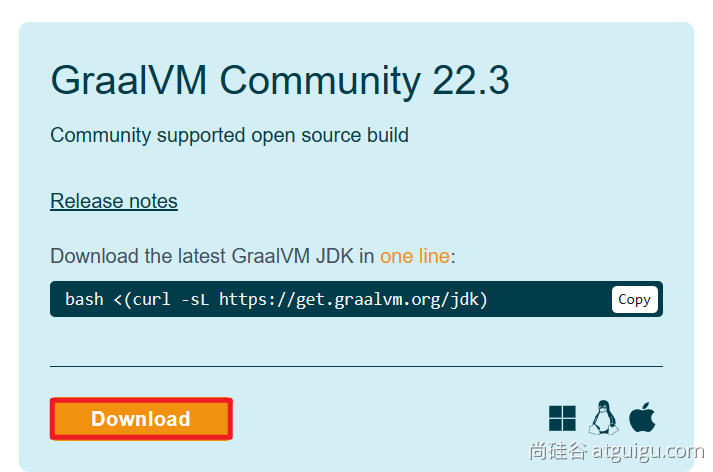
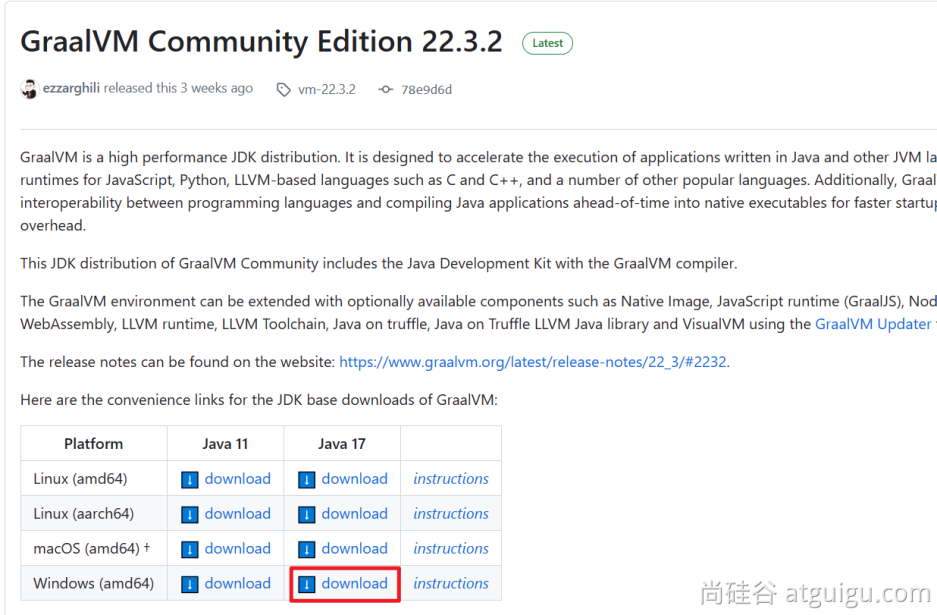
GraalVM 安装 下载 GraalVM + native-image
配置 修改 JAVA_HOME 与 path,指向新的bin(GraalVM是用来平替JDK的)java --version命令,验证环境为GraalVM提供的即可。
依赖 最新版的GraalVM中已经携带了native-image,无需再进行下面的安装配置
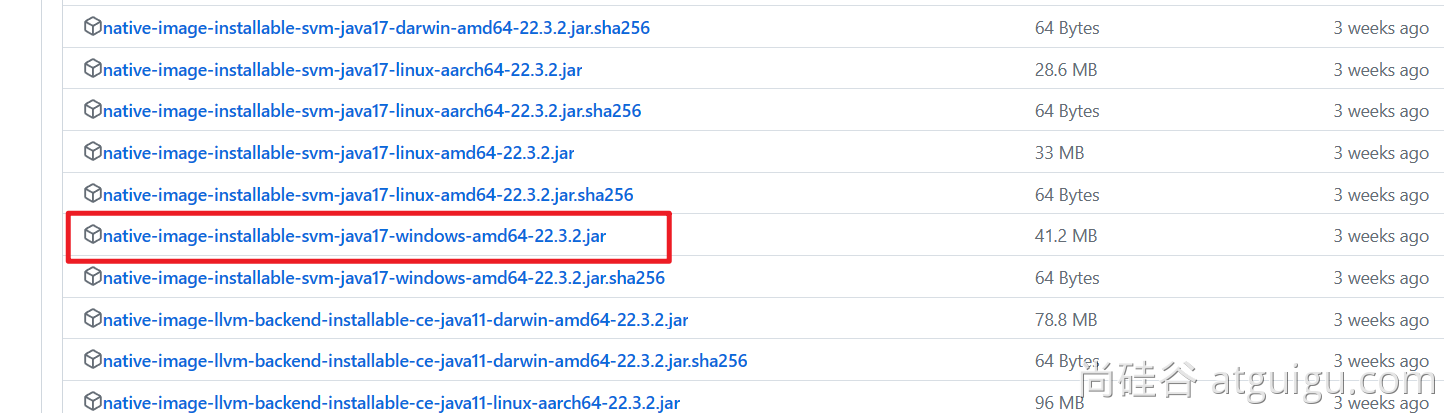
网络环境好:参考:https://www.graalvm.org/latest/reference-manual/native-image/#install-native-image
网络不好,使用我们下载的离线jar;native-image-xxx.jar文件1 gu install --file native-image-installable-svm-java17-windows-amd64-22.3.2.jar
验证
测试 创建项目 创建普通java项目,编写HelloWorld类
使用mvn clean package进行打包
确认jar包是否可以执行java -jar xxx.jar
普通maven项目打可执行jar可以使用插件maven-jar-plugin指定主类入口
1 2 3 4 5 6 7 8 9 10 11 12 13 14 15 16 <build > <plugins > <plugin > <groupId > org.apache.maven.plugins</groupId > <artifactId > maven-jar-plugin</artifactId > <version > 3.3.0</version > <configuration > <archive > <manifest > <mainClass > com.ys.App</mainClass > </manifest > </archive > </configuration > </plugin > </plugins > </build >
或者使用插件maven-shade-plugin,可以把依赖的jar也一起打进jar包
1 2 3 4 5 6 7 8 9 10 11 12 13 14 15 16 17 18 19 20 21 22 23 24 25 <build > <plugins > <plugin > <groupId > org.apache.maven.plugins</groupId > <artifactId > maven-shade-plugin</artifactId > <version > 3.5.0</version > <executions > <execution > <phase > package</phase > <goals > <goal > shade</goal > </goals > <configuration > <transformers > <transformer implementation ="org.apache.maven.plugins.shade.resource.ManifestResourceTransformer" > <mainClass > com.ys.App</mainClass > </transformer > </transformers > </configuration > </execution > </executions > </plugin > </plugins > </build >
编译镜像
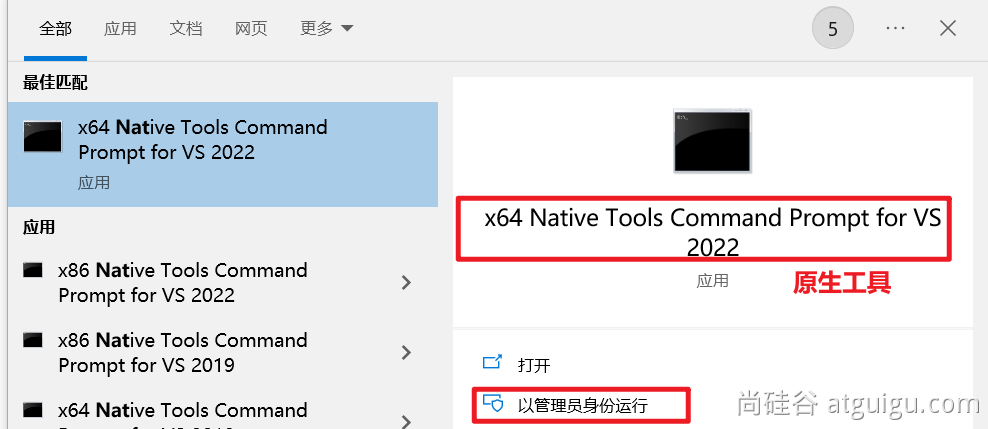
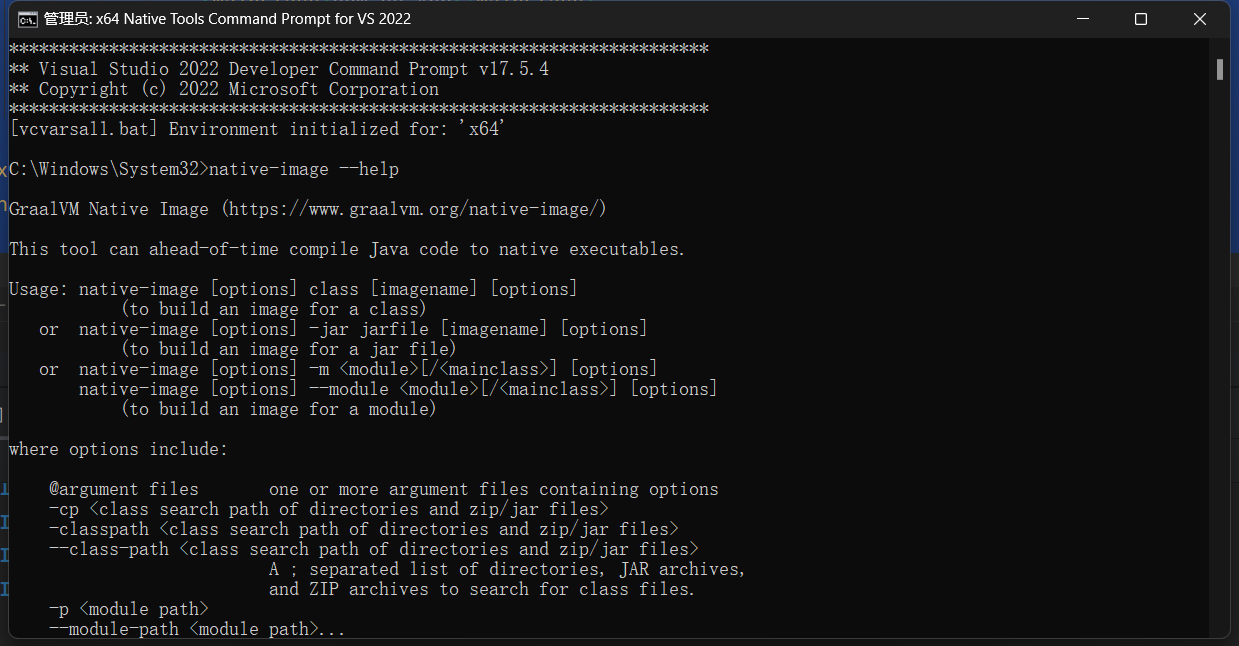
编译为原生镜像(native-image):使用native-tools终端
-H:-CheckToolchain环境检查,打包之前会自动检查本地环境,检查有可能会不通过,如果确认本地环境没有问题,那么可以添加此参数跳过环境检查
1 2 3 4 # 通过jar包打原生镜像,需要指定入口主类,通过入口编译整个jar native-image -H:-CheckToolchain -cp boot3-09-common-1.0-SNAPSHOT.jar com.ys.App -o App # 通过class字节文件打包原生镜像 native-image -H:-CheckToolchain -cp classes com.ys.App -o App
Linux平台测试
安装gcc等环境1 2 yum install lrzsz sudo yum install gcc glibc-devel zlib-devel
下载安装配置Linux下的GraalVM、native-image
1 2 3 4 5 6 7 8 tar -zxvf graalvm-ce-java17-linux-amd64-22.3.2.tar.gz -C /opt/java/ sudo vim /etc/profile # 修改以下内容 export JAVA_HOME=/opt/java/graalvm-ce-java17-22.3.2 export PATH=$PATH:$JAVA_HOME/bin source /etc/profile
安装native-image
1 gu install --file native-image-installable-svm-java17-linux-amd64-22.3.2.jar
使用native-image编译jar为原生程序
1 native-image -cp xxx.jar org.example.App
SpringBoot整合
依赖导入 1 2 3 4 5 6 7 8 9 10 11 12 <build > <plugins > <plugin > <groupId > org.graalvm.buildtools</groupId > <artifactId > native-maven-plugin</artifactId > </plugin > <plugin > <groupId > org.springframework.boot</groupId > <artifactId > spring-boot-maven-plugin</artifactId > </plugin > </plugins > </build >
生成native-image
运行aot提前处理命令: mvn springboot:process
运行native打包: mvn -Pnative native:build1 2 # 推荐加上 -Pnative mvn -Pnative native:build -f pom.xml
常见问题 可能提示如下各种错误,无法构建原生镜像,需要配置环境变量;
出现cl.exe找不到
出现乱码
提示no include path set
提示fatal error LNK1104: cannot open file 'LIBCMT.lib'
提示各种其他找不到
需要修改三个环境变量:Path、INCLUDE、lib
Path:添加如下值1 D:\APP\develop\VS\Enterprise\VC\Tools\MSVC\14.35.32215\bin\Hostx64\x64
新建INCLUDE环境变量(个人电脑win11下不存在在对应路径无法配置):值为1 C:\Program Files\Microsoft Visual Studio\2022\Community\VC\Tools\MSVC\14.33.31629\include;C:\Program Files (x86)\Windows Kits\10\Include\10.0.19041.0\shared;C:\Program Files (x86)\Windows Kits\10\Include\10.0.19041.0\ucrt;C:\Program Files (x86)\Windows Kits\10\Include\10.0.19041.0\um;C:\Program Files (x86)\Windows Kits\10\Include\10.0.19041.0\winrt
新建lib环境变量(不存在对应路径),值为1 C:\Program Files\Microsoft Visual Studio\2022\Community\VC\Tools\MSVC\14.33.31629\lib\x64;C:\Program Files (x86)\Windows Kits\10\Lib\10.0.19041.0\um\x64;C:\Program Files (x86)\Windows Kits\10\Lib\10.0.19041.0\ucrt\x64